How to treat leg fractures in young calves
Recognizing leg problems early and acting quickly to properly stabilize the injured limb for proper healing can help ensure a good outcome for injured calves.
March 12, 2015
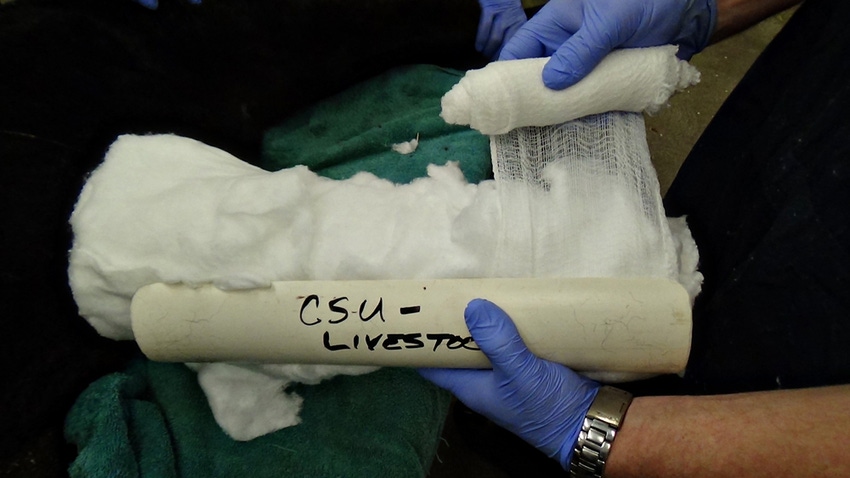
Occasionally, a newborn or young calf suffers a fractured limb. Such injuries can happen during a difficult birth or by being stepped on by a cow. Regardless of the cause, these injuries require a cast or splint for proper healing.
Matt Miesner, Kansas State University Veterinary Health Center, says incorrect methods when applying chains or straps to the calf in assisting a difficult birth causes some leg fractures.
“Fortunately, we see fewer such injuries today because there’s more awareness among producers about how to pull a calf correctly – spreading pressure of chains/straps with two loops, one above and one below the fetlock joint, and proper use of calf jacks,” he says.
More common today, he says, are femur fractures, which occasionally occur during pulling of a backward calf during birth.
“If someone pulls downward on the calf too soon, as the calf is coming through the pelvis and before the hind legs are out of the pelvis, this wedges the calf’s legs in the cow’s pelvis and can fracture the femurs. It’s like putting a stick on your knee and breaking it,” Miesner says. A break this high on the leg is hard to repair, he notes.
George Barrington, DVM, Washington State University professor of food animal medicine and surgery, says calving accidents can be avoided if calves are positioned correctly, and the person pulling the calf determines that the calf can actually be delivered vaginally. “If the calf is too big, the risk for injury is much greater,” he says.
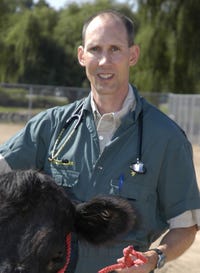
Rob Callan, Colorado State University
Rob Callan, head of the livestock medicine and surgery at Colorado State University, says fractures sometimes occur when the calf is upside down or sideways and too much pressure is exerted on the legs to rotate the calf into correct position. “The common method is to twist the legs around each other to rotate the calf. This twisting can cause one or both legs to fracture, generally at mid-cannon,” he says.
When trying to rotate a calf, Callan recommends rocking the calf back and forth by twisting and relaxing, rather than just twisting harder until the calf becomes right-side up. “If the calf is already coming through the pelvis, push him farther back into the uterus where there’s more room to rotate him,” he explains.
Trampling injuries
Calf injuries from trampling typically happen when a herd is distressed, like when cows are scurrying to locate and protect their calves when harassed by dogs, coyotes or wolves. A broken leg can also result when a heifer isn’t careful in moving around her new calf, Barrington says.
“Sometimes, we see broken legs because cattle are confined in a small area, or a protective mother can inadvertently step on her calf when trying to defend it. Some cases are just bad luck, whereas others involve management issues that could be improved,” Barrington says.
He adds that nutritional or metabolic conditions, such as copper deficiencies in the Northwest, can cause weak or brittle bones. “Just one calf with a fracture might be bad luck, but if multiple fractures occur, there may be an underlying cause. There could be an underlying trace mineral or nutrition issue,” he explains.
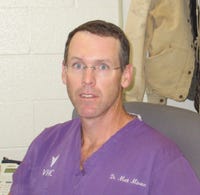
Matt Miesner, Kansas State University Veterinary Health Center
Miesner sometimes sees growth plate fractures, usually at the end of the cannon bone, above the fetlock joint. “This injury might happen when people are working cattle, maybe at branding time. If you notice it soon, we can just slide the bone back into place, cast it for as little as two weeks, and it heals quickly because it is right at the growth plate. The location doesn’t affect overall growth of the leg after it heals,” he says.
With this type of break, the leg isn’t floppy, he explains. “You just see deviation in straightness of the limb because it slid off the growth plate; it’s stiff, and hard to get back into place. The sooner it’s recognized, the better, so we can slide it back. These usually require a cast because a splint isn’t stiff enough for adequate support,” Miesner says.
First aid for fractures
The first rule in a leg fracture is to ensure no further damage occurs, specialists say. Find a way to support and immobilize the injured limb until the calf can be treated by a veterinarian. Determine the location of the fracture, and if possible stabilize it with a padded bandage or splint. Don’t just throw the calf in the back of a pickup and take it to the vet without protecting the leg.
“The basic rule for a lower leg is to immobilize the joints above and below the fracture,” Barrington says. “If the fracture involves a cannon bone, we immobilize the knee or hock above it, and the fetlock joint below it. If it’s a tibia fracture (between the hock and stifle), without specialized splinting, it is difficult to immobilize the stifle. These fractures are more challenging and you should seek veterinary help as soon as possible,” he adds.
Lower leg fractures are easier to immobilize. “Use lots of padding to keep it clean and stable. We want to prevent a closed fracture from becoming an open fracture because that suddenly becomes a more significant injury. Expense, materials and time involved with open fracture care increases dramatically,” Barrington says.
Callan suggests two basic methods for producers to support a broken leg until assessment by a veterinarian. “One is a Robert Jones bandage, using a thick layer of cotton padding over the leg. Roll cotton and bandaging material can be bought inexpensively at a veterinary supply store or online.”
To apply a Robert Jones bandage, Callan says to begin at the calf’s foot, and wrap the roll cotton up the leg to the joint above the fracture. “You need two to four layers of cotton, so it’s thick with plenty of padding. Then tightly wrap over the cotton with roll gauze, followed by Vet wrap to compress the cotton and hold it in place. The outside of the bandage should feel firm and solid. This will stabilize the fracture until the calf can be examined by your veterinarian,” Callan says. Duct tape or a rectal sleeve can also be applied over the leg to keep the bandage dry.
A second option is to apply a splint to provide support/stabilization for a longer period of time. This is important if it might be several days before the calf can be seen by a veterinarian, Callan adds.
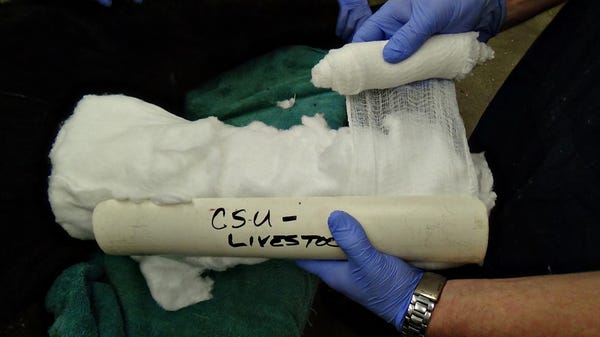
To stabilize a fracture until the calf can be examined by your veterinarian, begin by applying a Robert Jones bandage at the calf’s foot, and wrap roll cotton up the leg to the joint above the fracture. Use 2-4 layers of cotton, so it’s thick with plenty of padding. Then tightly wrap over the cotton with roll gauze, followed by Vetwrap to compress the cotton and hold it in place. The outside of the bandage should feel firm and solid.
Effective splints can be made from PVC pipe. “Start with a pipe 2 or 3 inches in diameter, depending on size of the calf,” Callan says. “Cut it lengthwise, in thirds, to make the splint. On a front leg, the splint must be long enough to go from the heel of the foot to a couple inches above the knee or hock.
“The splint for a hind leg must bend at the hock. Heat the PVC pipe with a cutting torch until it will bend at the proper angle. Use a file or rasp to round off the edges of the top and bottom, so it won’t cut into the limb. Some people cover the ends of the splint with cotton, taped on for padding,” Callan says
Before applying the splint, wrap the leg with roll cotton for padding between the leg and the splint.
“You don’t need as thick a layer of cotton as for a Robert Jones bandage; just enough to provide padding under the splint so it doesn’t put pressure on the leg,” Callan says. “Pull apart the layers of the roll cotton. If you use about 1/3 thickness, it’s easier to wrap around the leg. Start at the bottom of the leg and wrap it around and up the leg to create a half- to 1-inch layer of padding covering the leg.
“Place the splint on the back of the leg from the heel to above the knee or hock. Or, you can place it on the front of the leg from the toe to just above knee or hock,” Callan says. The padding under the PVC splint should fit snugly – not too loose or too tight.
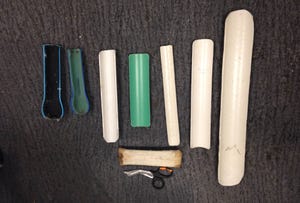
Effective splints can be made from PVC pipe. Start with a pipe 2 or 3 inches in diameter, depending on size of the calf.
After applying the splint over the padding, wrap it tightly with roll gauze, and apply Vetwrap over the gauze. This will hold the PVC in place and stabilize the leg. “Put some sticky elastic tape at the top and bottom to help keep dirt, or straw and hay from getting under the splint,” he says.
Young calves generally heal quickly. They also grow fast, so make sure the splint doesn’t become too tight on the leg. The split PVC pipe will allow for some expansion. The general recommendation is to reset the splint in three to four weeks.
“You want to provide enough support, long enough, to make sure the healing bone is strong enough to support the calf. For a splint, this means at least four to six weeks for a young calf. Don’t take a splint or cast off too early. Even if the leg is healing well, the calf can re-fracture the leg if the support is removed,” Miesner says.
While lower leg fractures tend to heal easily, higher fractures, especially of the femur (between hip and stifle), are more difficult. A radius/ulna (between knee and elbow in the front leg) or tibia fracture (between hock and stifle) usually require a special type of splint called a Thomas-Schroeder splint.
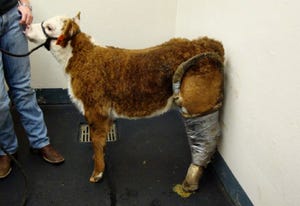
A radius/ulna (between knee and elbow in the front leg) or tibia fracture (between hock and stifle) usually require a special type of splint called a Thomas-Schroeder splint.
“It looks like a crutch that goes beneath the armpit (in front) or groin (in back), attached to the bottom part of the leg at the hoof. The limb is stretched between the top and bottom; the crutch-type splint spans the whole leg,” Miesner says. “I have several of these Thomas-Schroeder splints made up in different sizes for different size calves. They can be created for as little as $20 to $30.”
Miesner says he’s had ranchers use and keep Thomas-Schroeder splints. The veterinarian can reuse the same splint for a future break.
Specialists advise producers to have emergency supplies on hand. Roll cotton, roll gauze and Vetwrap should be purchased before calving time. Meanwhile, a few appropriately sized splints can be cut from PVC pipe ahead of calving so they are available if and when they’re needed.
Cast materials
Miesner says cast material is fairly inexpensive and easy to apply. “In most instances, I recommend casting, for better stability,” he says. “Cast material form-fits to the leg. Young calves with breaks below the knee or hock heal quickly and only need to wear the cast for 3 to 4 weeks.”
Barrington says fiberglass casts are much handier than the old familiar plaster-of-Paris casts. When plaster gets wet, it falls apart, but fiberglass casts are more resilient, breathe and can dry out again if they get wet. “You can add waterproof material to the outside of the cast, or provide shelter for the calf until the cast can be taken off,” he says.
Callan says an easy way to waterproof a splint or cast is to apply silicone with a silicone gun to smear the entire surface. This creates a tough, waterproof barrier to protect the cast or splint.
Calf bones grow quickly, so care must be taken to ensure a cast doesn’t grow too tight. “I usually write on the cast in big letters the date we should check it and the date to remove it so the calf doesn’t outgrow the cast and create more problems,” Miesner says.
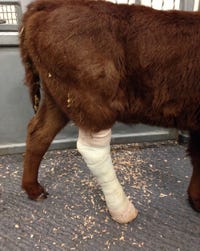
Calf bones grow quickly, so care must be taken to ensure a cast doesn’t grow too tight. One vet suggests writing in big letters the date the cast should be checked.
Generally, the cast can be cut lengthwise after a few weeks and left to expand a bit, with taping around it to hold it together in a slightly larger size.
When the cast is removed, clean it up and save it. “This can be used later as a splint for another calf with a fractured leg if that calf is about the same size,” Callan says. “Just place roll cotton padding over the leg, put both pieces of the cast over the cotton, and wrap the two pieces of cast together with strong elastic tape.”
Stall rest is important
A femur or humerus fracture will sometimes heal even though it can’t be cast or splinted. “Options involve surgery with internal or external fixation (plates, screws, pins, etc.), which can be very expensive, or letting them heal on their own,” Barrington says. In the right situation, it’s amazing how calves with major fractures can heal with no intervention.
“If possible, our approach for a calf with a fracture of the femur or humerus might simply involve keeping the calf confined in a small area for 4 to 6 weeks, and let nature try to heal it. Most ranchers can’t afford $2,000-$5,000 to surgically treat a fracture. But if the calf can get around on three legs, nursing and eating, we might try to keep the calf comfortable and quiet and give it some time,” Barrington says.
Newborn calves heal quickly, compared with older, heavier animals. “Sometimes they heal so quickly that the leg has already started to heal by the time the rancher finds the animal. In this case, there may not be much you can do but keep the calf quiet. Even if the bone is not perfectly aligned, it usually corrects over time because bone keeps remodeling as the calf grows,” he says.
“I’ve been amazed at how often stall rest (keeping the calf confined and inactive) allows those fractures to mend. We usually put the calf on painkillers and antibiotics, and they often heal in spite of having no way to immobilize the leg. We just have to make sure the welfare of the calf is addressed and monitored. Not all of them heal, and humane euthanasia may be indicated,” Barrington says.
As long as there is no bone sticking through the skin – no risk for infection – and the calf remains comfortable, it has a good chance of healing. The younger the animal, the faster bones heal.
“Calves are pretty smart about not using the leg very much. I’ve seen several that were missed – the calf disappeared and then the rancher found it with a leg that looks like it was broken, but has already healed,” Miesner says.
Compound fractures
“Carefully examine the leg to see if there is any bruising, open wounds, bone sticking through the skin, or any blood,” Callan says. “If the skin has been penetrated, this greatly increases risk for bone infection. If there is any damage to the skin, put the calf on an antibiotic immediately.”
Open fractures have a poorer prognosis. “We always want to know where the break is, how long ago it happened, and whether any bone penetrated the skin,” Miesner says. He’s seen cases where poorly applied splints created issues because they didn’t give enough support and the fracture became compounded and infected.
Recognizing problems early, and realizing importance of proper stabilization or management for proper healing, can help ensure a good outcome.
Heather Smith Thomas is a rancher and freelance writer based in Salmon, Idaho.
You May Also Like


.png?width=300&auto=webp&quality=80&disable=upscale)
